

OEM Recovery Machine Guide for Beginners and Pros
2026-11-16
When it comes to OEM recovery machines, most guides either drown you in jargon or skip the details that actually matter on the job. This one is different. Whether you're a beginner trying to figure out why your recovery pump isn't pulling a deep vacuum or a seasoned pro chasing faster evacuation times, you'll find straight answers here—no fluff, no recycled spec sheets. And if you've been around HVAC or appliance repair for any length of time, you've likely crossed paths with HONGSEN, a brand that keeps earning its place in vans and workshops where downtime isn't an option. Consider this your practical roadmap: what to look for, what to avoid, and how to get the most out of your machine without burning through refrigerant or patience.
What Actually Happens When You Hook Up a Recovery Machine Wrong
Hooking up a recovery machine wrong isn’t a subtle mistake—it announces itself fast. If you swap the high and low side hoses or forget to open the cylinder valve, the compressor tries to pull against a closed path or pushes liquid where only vapor belongs. The discharge pressure spikes, the machine chatters, and liquid refrigerant can slam into the compressor’s reed valves. In a matter of seconds you either trip the internal overload or blow a relief plug, neither of which is quiet.
The most common screw-up is attaching to the liquid port instead of the vapor port. Recovery machines are designed to handle vapor, not raw liquid. When liquid refrigerant floods the cylinder, the oil gets washed out, and the compressor runs dry until it seizes or scores a piston. Even if it survives, the oil separator can’t cope, and your next few recovery jobs will run hot and slow because the internals are already scarred.
There’s also the quieter damage you don’t hear right away. A loose fitting or crossed hose can pull air and moisture into the recovery cylinder. That contaminates the recovered refrigerant, makes downstream reclamation harder, and can turn a simple recovery into a full system flush. So before you hit the switch, trace every hose, open the right valves, and double-check the cylinder’s vapor port—because the machine won’t forgive a ten-second oversight.
The Setup Sequence Most Manuals Leave Out
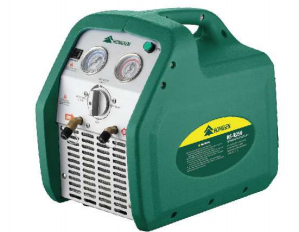
Manuals tend to rush you from unboxing to calibration without acknowledging that a good setup is less about following steps in order and more about reading the room. Before touching a single knob or cable, check how the device sits on the surface: a slight tilt, a nearby heat source, or a stretched power cord can quietly undermine performance later. Give it enough clearance to breathe, and make sure every port you will need is actually reachable without crawling behind a desk.
Most guides skip the middle phase where you power on with nothing connected except the bare minimum. Do that first. Let the machine finish its own internal checks, watch for unexpected lights or faint sounds, and only then start attaching peripherals one at a time. This isolates issues immediately instead of leaving you to guess which cable or setting caused a problem after everything is already tangled together.
The final overlooked move is to write down two or three baseline values right after a successful setup: input lag, idle temperature, fan speed, or whatever is relevant to your gear. That small note becomes the reference point for every future “is this normal?” moment. Manuals rarely tell you to create your own baseline, but it is the single habit that makes troubleshooting faster and upgrades much less intimidating.
Reading Pressure Gauges Like a Seasoned Tech, Not a Rookie
A rookie stares at a needle and writes down whatever number is closest. A seasoned tech first checks if the gauge is even trusted. Give it a light tap with a fingernail near the fitting—if the needle jumps, you've got stiction in the movement, and that reading is garbage until you swap the gauge or work it loose. Also glance at the dial face for the little red zero-adjust screw; if it's been cranked by someone else, your baseline is already off. Before you trust any psi, know what range the gauge is built for: using a 0–300 psi gauge to check a 10 psi fuel system will bury the error in the bottom 5% of the scale.
Parallax will lie to you every time if you let it. Get your eye dead square with the needle, not off to the side like you're reading a car speedometer from the passenger seat. If the needle rests between two tick marks, don't round it—estimate the fraction honestly. Then, watch the needle for a few seconds under live pressure. A steady drift downward usually means a leak or thermal contraction; a rapid chatter can be a pump pulsation or a failing check valve. Seasoned techs read the needle's behavior, not just its resting spot.
Finally, compare your gauge to a known reference. Thread a second gauge onto the same port and see if they agree within a few psi. If not, one of them is lying, and you need to figure out which before making a call on the system. Never trust a gauge that's been dropped, frozen, or left in the sun—those cheap dials shift more than a politician's promise. And when you're done, store gauges with the needle at zero, not buried at pressure, so the bourdon tube doesn't take a set.
Why Your Recovery Times Are Slower Than They Should Be
Most people assume that slower recovery is simply a sign of age or overtraining, but the real culprit is often hidden in the details of your daily routine. Your muscles don't rebuild during workouts—they break down. The repair happens afterward, and if you're not paying attention to the two or three hours following intense exercise, you're leaving gains on the table. Simple things like skipping a post-workout meal or staying up late scrolling through your phone can sabotage the exact processes your body needs to bounce back fast.
Another overlooked factor is the quality of your movement patterns outside the gym. Sitting at a desk for eight hours, then hammering heavy squats, creates a mismatch your body has to work overtime to fix. Recovery isn't just about what you do after a session; it's about how you spend the other twenty-three hours. If your hips are tight from driving, your shoulders rounded from typing, and your sleep is fragmented from stress, your body's repair crew is constantly playing catch-up. That's why even a well-designed training plan can leave you feeling flattened if the rest of your life fights against it.
Finally, stop mistaking soreness for progress. Delayed onset muscle soreness is a normal response, but if it's lingering for days and affecting your next workout, you're in a recovery debt that compounds quickly. Instead of pushing through with more volume or intensity, try lowering the load by ten percent and adding an extra ten minutes of low-intensity movement on your off days. The goal is to keep blood flowing without creating additional damage. Once you treat recovery as a skill rather than an afterthought, your times will drop faster than you expect.
Preventative Maintenance That Most Techs Skip Until It’s Too Late
The anode rod in a water heater is a classic example. It’s designed to corrode so the tank doesn’t, but most techs never pull it out for inspection. They only think about it when the tank starts leaking rusty water onto the floor, and by then the damage is already done. A quick check every two or three years can easily double the life of the unit, yet it rarely makes the routine list.
Condensate drain lines on air handlers are another overlooked spot. A little algae or mold builds up, the line clogs, and suddenly there’s water dripping through a ceiling. I’ve lost count of how many emergency calls were just a blocked drain that could have been cleared with a wet-dry vac or a blast of compressed air during a regular tune-up. It’s not glamorous work, but it prevents a lot of drywall repair.
Then there’s torque checking on electrical panels. Connections loosen over time from thermal cycling, and that leads to heat, arcing, and eventually a tripped breaker or worse. Most techs install the panel, close the cover, and never come back until something fails. Spending ten minutes with a torque screwdriver once a year would catch half the problems before they ever show up as a service call.
Advanced Tricks for Mixed Refrigerants and Contaminated Systems
When a system has been topped off with the wrong refrigerant or has picked up moisture and acids, standard evacuation and recharge won't cut it. One of the first moves is to pull the entire charge into a dedicated recovery cylinder and have it analyzed. If you're dealing with a mix like R-22 and R-410A, do not simply vent or reuse it; the fractionation behavior under different pressures makes it unpredictable in the metering device. Instead, treat the old gas as hazardous waste and start the system clean.
Contaminated systems often hide sludge in the evaporator and condenser. After recovering the refrigerant, flush the lines and coils with a solvent that is compatible with the remaining oil and the new refrigerant. For severe burnout, you may need to cut out the filter drier and inspect the capillary tube or TXV screen for carbon deposits. A trick that saves callbacks is to install a high-capacity suction line filter drier, run the system for a few hours, then check the pressure drop across it. If the drop exceeds the manufacturer's spec, replace the drier before it becomes a restriction.
Non-condensables like air and nitrogen are another common contamination. If you suspect air in the system, compare the standing pressure against the ambient temperature on a PT chart. A reading noticeably higher than saturation pressure means you should recover, evacuate to below 500 microns with a good vacuum pump and a micron gauge placed far from the pump, and then recharge with virgin refrigerant. For mixed refrigerant situations, do a triple evacuation with dry nitrogen sweeps between vacuum pulls to help strip residual refrigerant from the oil. This step is often skipped, but it makes a huge difference in compressor reliability and TXV performance.
FAQ
It's a dedicated utility that pulls the original factory image from a hidden partition on your laptop or desktop. Unlike a generic Windows ISO, it includes the specific drivers, bundled software, and license tie-ins that the manufacturer shipped with the machine. This means you get a system that matches the out-of-box state rather than a clean but sometimes driver-incomplete vanilla install.
Yes, that's one of the core use cases. The guide walks through extracting the factory.wim or install.esd from the recovery partition and writing it to a bootable USB. You need at least a 16 GB stick for most modern systems, though some older images squeeze onto 8 GB. Formatting as FAT32 is typically required for UEFI boot, but larger files may force NTFS with a separate boot loader.
A big one is trying to back up from a machine that has already been wiped or upgraded to a newer Windows version. The original recovery partition may have been deleted or overwritten. Another pitfall is picking the wrong source drive and accidentally copying the active system instead of the factory image. Also, some people skip verifying the image after creation, which leads to unbootable media later.
It does, but with a caveat. You can sometimes reconstruct a functional recovery environment using the manufacturer's downloadable recovery media or the embedded product key, but you won't get the exact factory layout back. The guide distinguishes between what's possible with a full disk image backup versus what the built-in OEM partition alone can do.
Most major Windows PC makers store recovery data in a similar way, so the workflow applies to Dell, HP, Lenovo, Acer, ASUS, and others. The tricky part is that some brands use custom boot loaders or partition GUIDs. The guide includes specific notes for Lenovo's OneKey and ASUS's recovery environment, for instance.
Not directly. The tool is designed to restore the original edition that came with the machine. If your device shipped with Windows 10 Home, that's what you'll recover. Changing editions requires a separate license and a clean install path. The guide cautions against mixing OEM images with different edition keys because activation will fail.
Creating the bootable USB takes 15 to 40 minutes depending on USB speed and image size. Restoring the image to a new drive can take another 30 to 90 minutes on a traditional hard disk, less on an SSD. The guide recommends budgeting about two hours if you include reading, downloading any helper tools, and verifying the result.
Conclusion
Hooking up a recovery machine incorrectly isn't just a minor slip—it can backfeed liquid into the compressor, destroy seals, or send contaminated refrigerant straight into your tank. Most OEM manuals gloss over the exact sequence: purge the hoses, open the tank valve before the machine, and confirm the recovery cylinder is on a scale. Skip this and you'll chase phantom leaks for hours. Once running, seasoned techs read pressure gauges as a story, not just numbers: a static equalization that takes forever points to a blocked filter drier, while a sudden drop on the low side with a hot high side often means the condenser is starved for air. If your recovery times are lagging, check the obvious first—subcooled liquid feeding the machine recovers three times faster than vapor, and a dirty condenser coil can cut efficiency by half. But the real difference between a beginner and a pro shows in preventative maintenance and contamination handling. Most techs never backflush the recovery machine's oil separator or replace the inlet filter until it's too late, yet a ten-minute monthly flush prevents cross-contamination and extends compressor life. For mixed refrigerants or burnouts, never recover into a standard tank: use a dedicated recovery cylinder with a working pressure rating for the highest pressure component, and consider a liquid trap or acid-away filter when the system shows signs of moisture or copper plating.
Advanced tricks separate the wizards from the parts-changers. When dealing with unknown mixed gases, run a pressure-temperature cross-check before charging—recover a small vapor sample into a clean gauge and compare saturation temperatures; if they don't match any known refrigerant, quarantine the tank and label it as mixed. For heavily contaminated systems, install a replaceable core filter-drier in the recovery line in both directions, and pull a deep vacuum on the recovery tank before the first hookup. Also remember that recovery machine speed maxes out when you keep the tank cool—ice packs or a water bath around the cylinder can shave 30% off your time on a hot rooftop. Ultimately, the OEM machine is durable but dumb: it only does what your hose routing, valve timing, and tank prep tell it to do. Master those, and you'll stop fighting the equipment and start recovering like a pro.
Contact Us
Contact Person: KOPASS HO
Email: [email protected]
Tel/WhatsApp: 8613606566112
Website: https://www.hongsenref.com/